Arduino Relay Wiring - Arduino Lesson 1 Channel Relay Module Osoyoo Com - Jumper wires / dupont wires.. This relay has 5 pins. First we will control a simple led then we will control a light bulb using it. This article shows how to control mains voltage with the arduino using a relay module. Jumper wires / dupont wires. Arduino relay control over the internet.
How to use the arduino relay module with the high voltage devices. Jumper wires / dupont wires. If you do any work with mains power such as 120v or 240v ac power wiring, you should always use proper. In this article, we are going to control an arduino relay module. * a relay basically allows a relatively low voltage to easily control higher power circuits.
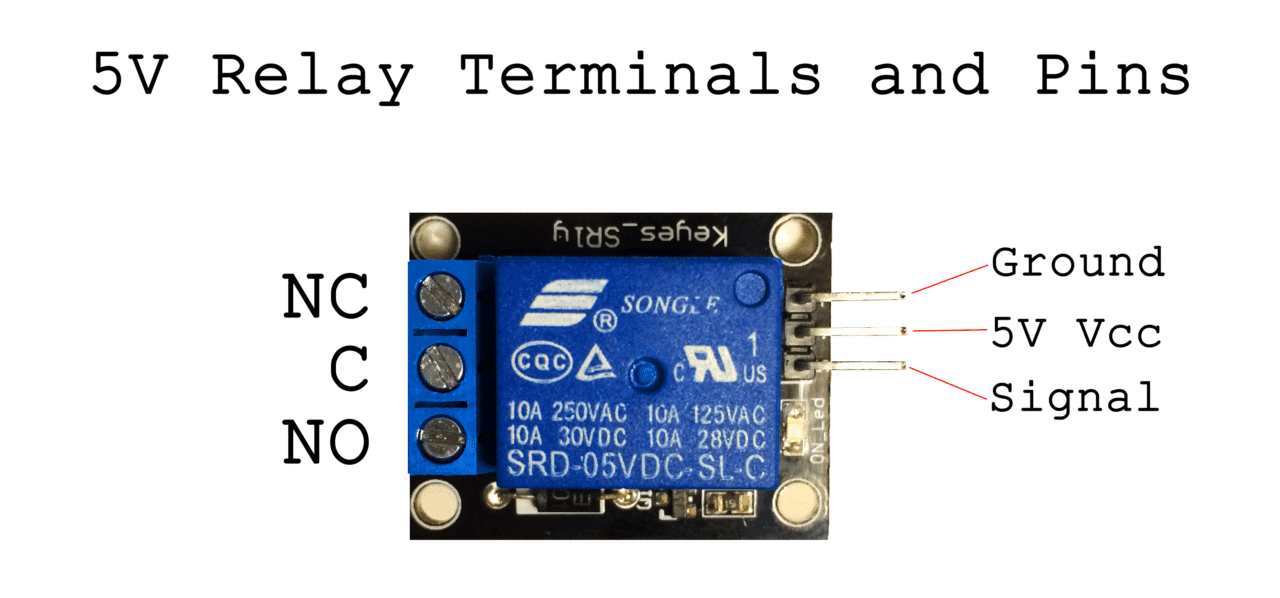
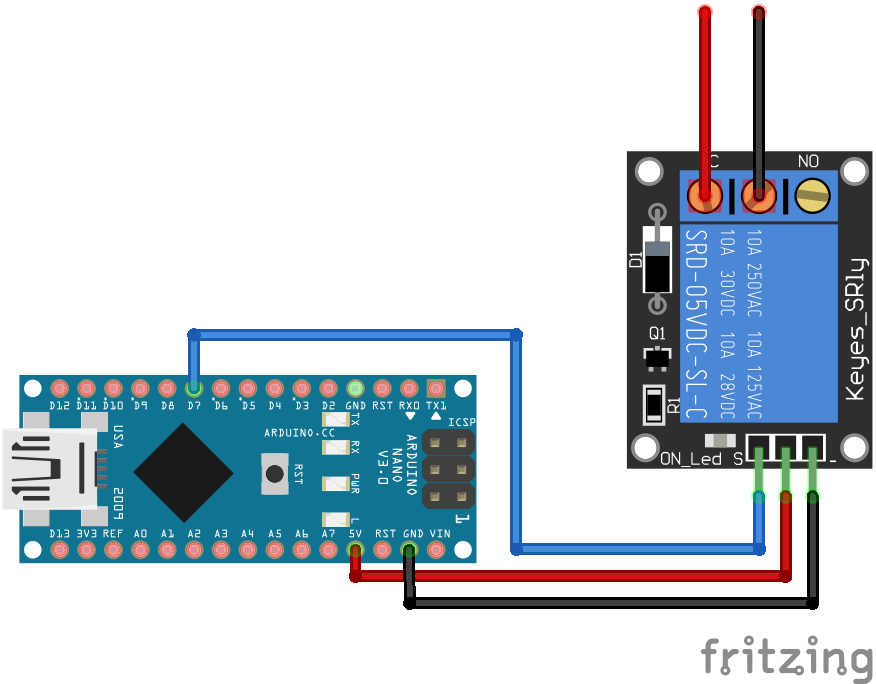
How To Set Up A 5v Relay On The Arduino Circuit Basics from www.circuitbasics.com Arduino relay control over the internet. This relay has 5 pins. If you do any work with mains power such as 120v or 240v ac power wiring, you should always use proper. * a relay basically allows a relatively low voltage to easily control higher power circuits. Here we are not using any relay driver ic like uln2003 and will only use an npn transistor to control relay. The arduino can be programmed to turn on the relay when a certain event occurs, for example when the temperature of a thermistor gets higher than 30°c. Here is a wiring diagram you can use: Jumper wires / dupont wires.
The arduino can be programmed to turn on the relay when a certain event occurs, for example when the temperature of a thermistor gets higher than 30°c.
The arduino can be programmed to turn on the relay when a certain event occurs, for example when the temperature of a thermistor gets higher than 30°c. This is my 4th tutorial on how to drive a relay (not a relay module) with an arduino. Arduino relay control over the internet. How to use the arduino relay module with the high voltage devices. Use the sketch to connect the relay to the arduino. If you do any work with mains power such as 120v or 240v ac power wiring, you should always use proper. In this article, we are going to control an arduino relay module. Or when the resistance of a photoresistor. In the past, i used to build a circuit just like the above. Here, the in pin of the module is attached to d3 of the arduino uno. 4 channel relay board or shield. Here we are not using any relay driver ic like uln2003 and will only use an npn transistor to control relay. Learn to interface two channel relay module with arduino along with relay working, hardware overview, power selection jumper setting, pinout, wiring and arduino code.
How to use the arduino relay module with the high voltage devices. Learn to interface two channel relay module with arduino along with relay working, hardware overview, power selection jumper setting, pinout, wiring and arduino code. Or when the resistance of a photoresistor. Use the sketch to connect the relay to the arduino. It is very popular relay among arduino and diy electronics hobbyists.
Relay Tutorial For Arduino Esp8266 And Esp32 from diyi0t.com Here we are not using any relay driver ic like uln2003 and will only use an npn transistor to control relay. Jumper wires / dupont wires. One of the two wires will be cut and connected to the common and the normally open pin of the module output connector. This article shows how to control mains voltage with the arduino using a relay module. * a relay basically allows a relatively low voltage to easily control higher power circuits. Or when the resistance of a photoresistor. In this arduino relay control tutorial we will simply learn how to interface a relay with arduino. The arduino can be programmed to turn on the relay when a certain event occurs, for example when the temperature of a thermistor gets higher than 30°c.
First we will control a simple led then we will control a light bulb using it.
In the past, i used to build a circuit just like the above. In this article, we are going to control an arduino relay module. Here is a wiring diagram you can use: First we will control a simple led then we will control a light bulb using it. Or when the resistance of a photoresistor. In this arduino relay control tutorial we will simply learn how to interface a relay with arduino. * a relay basically allows a relatively low voltage to easily control higher power circuits. Learn to interface two channel relay module with arduino along with relay working, hardware overview, power selection jumper setting, pinout, wiring and arduino code. Use the sketch to connect the relay to the arduino. The arduino can be programmed to turn on the relay when a certain event occurs, for example when the temperature of a thermistor gets higher than 30°c. If you do any work with mains power such as 120v or 240v ac power wiring, you should always use proper. This article shows how to control mains voltage with the arduino using a relay module. How to use the arduino relay module with the high voltage devices.
Or when the resistance of a photoresistor. Learn to interface two channel relay module with arduino along with relay working, hardware overview, power selection jumper setting, pinout, wiring and arduino code. One of the two wires will be cut and connected to the common and the normally open pin of the module output connector. First we will control a simple led then we will control a light bulb using it. In this article, we are going to control an arduino relay module.
In Depth Interface Two Channel Relay Module With Arduino from lastminuteengineers.com Arduino relay control over the internet. If you do any work with mains power such as 120v or 240v ac power wiring, you should always use proper. First we will control a simple led then we will control a light bulb using it. This relay has 5 pins. One of the two wires will be cut and connected to the common and the normally open pin of the module output connector. This is my 4th tutorial on how to drive a relay (not a relay module) with an arduino. Jumper wires / dupont wires. 4 channel relay board or shield.
First we will control a simple led then we will control a light bulb using it.
Jumper wires / dupont wires. A relay is an electrically operated switch that you can use to control mains voltage appliances. Here is a wiring diagram you can use: We will control two different devices using it. The arduino can be programmed to turn on the relay when a certain event occurs, for example when the temperature of a thermistor gets higher than 30°c. Arduino relay control over the internet. In this article, we are going to control an arduino relay module. Use the sketch to connect the relay to the arduino. This relay has 5 pins. One of the two wires will be cut and connected to the common and the normally open pin of the module output connector. In this arduino relay control tutorial we will simply learn how to interface a relay with arduino. This is my 4th tutorial on how to drive a relay (not a relay module) with an arduino. Here, the in pin of the module is attached to d3 of the arduino uno.